API Profiles
Ian Christopher (Deactivated)
Analytics
An API Profile enables the creation of a data policy for a particular set of API Resources, generally in support of a specific usage scenario (such as for Nutrition or Special Education specialty applications).
The policy is expressed as a set of rules for explicit inclusion or exclusion of properties, references, collections, and/or collection items (based on Type or Ed-Fi Descriptor values) at all levels of a Resource. The Profile can then be assigned to API consumer applications in the Security Configuration Tool to ensure that all requests made by the consumer for Resources covered by the Profile's data policy use the Profile-specific content types, and thus are appropriately constrained.
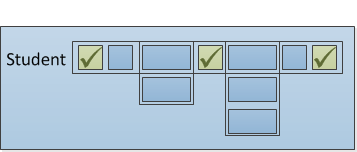
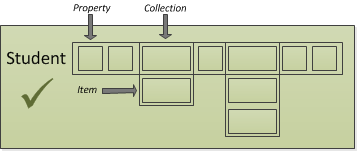 Figure 1. Depiction of the inclusion of all properties |
|
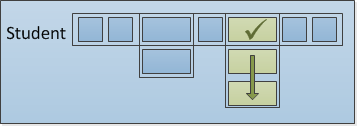 Figure 3. Depiction of the inclusion of a specific collection | 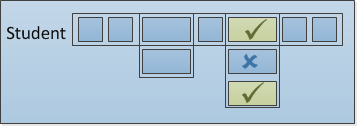 Figure 4. Depiction of the inclusion or exclusion of specific collection items |
| |
Include-Only vs. Exclude-Only Strategies
Platform implementers can choose to configure access by inclusion or exclusion, but it's useful to understand the implications of using IncludeOnly vs. ExcludeOnly member selection modes when defining Profiles.
If the IncludeOnly value is used exclusively, a very rigid Profile definition will result. As new elements are added to the data model (either through an implementer extending the data model or when upgrading to a new version of the Ed-Fi Data Standard), none of these added data elements will be included. However, if the Profile is defined using ExcludeOnly then these other elements will be automatically included, resulting in a more flexible definition that will not necessarily require adjustments over time. The implications of these two approaches is depicted in the diagram below:
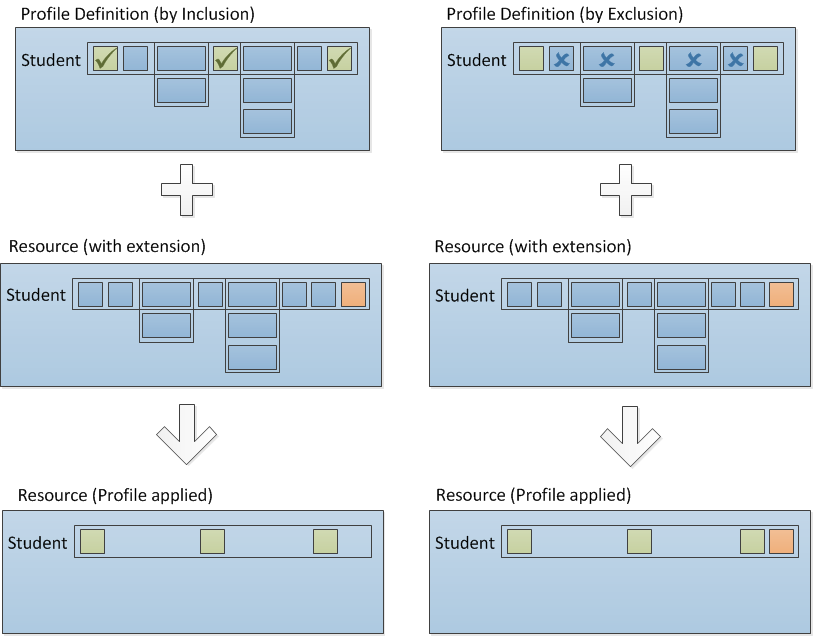
Figure 6. Depiction of the implications on Profile flexibility using Inclusion vs. Exclusion
Profile Definition
The Profile Definition is expressed in XML in terms of the Resource model's members (not to be confused with the JSON representation), and is used by the code generation process in Visual Studio to create all the API artifacts necessary.
An XML schema is included in the Ed-Fi-ODS repository at Ed-Fi-ODS\Application\EdFi.Ods.CodeGen\Models\ProfileMetadata\Ed-Fi-ODS-API-Profiles.xsd. Additionally, a set of sample profiles can be found at Ed-Fi-ODS\EdFi.Ods.Api.Models.SampleProfiles\Profiles.xml, and full set of test profile definitions can be found at Ed-Fi-ODS\EdFi.Ods.Api.Models.TestProfiles\Profiles.xml. These definitions contain many different variations of profiles applied to API resources and serve as useful examples for developers.
A Profile Definition can consist of multiple Resources (e.g., School and Student):
<!-- Multiple resources -->
<Profile name="Test-Profile-Student-and-School-Include-All">
	<Resource name="School">
		<ReadContentType memberSelection="IncludeAll" />
		<WriteContentType memberSelection="IncludeAll" />
	</Resource>
	<Resource name="Student">
		<ReadContentType memberSelection="IncludeAll" />
		<WriteContentType memberSelection="IncludeAll" />
	</Resource>
</Profile>
Resources can be readable or writable only:
<!-- Readable Only Profile-->
<Profile name="Test-Profile-Resource-ReadOnly">
	<Resource name="School">
		<ReadContentType memberSelection="IncludeAll" />
	</Resource>
</Profile>

<!-- Writable Only Profile-->
<Profile name="Test-Profile-Resource-WriteOnly">
	<Resource name="School">
		<WriteContentType memberSelection="IncludeAll" />
	</Resource>
</Profile>
Resource members can be explicitly included based on the member selection:
<!-- Resource-level IncludeOnly -->
<Profile name="Test-Profile-Resource-IncludeOnly">
	<Resource name="School">
		<ReadContentType memberSelection="IncludeOnly">
			<Property name="NameOfInstitution" />                               <!-- Inherited property -->
			<Property name="OperationalStatusType" />                           <!-- Inherited Type property -->
			<Property name="CharterApprovalSchoolYearTypeReference" />          <!-- Property -->
			<Property name="SchoolType" />                                      <!-- Type property -->
			<Property name="AdministrativeFundingControlDescriptor" />          <!-- Descriptor property -->
			<Collection name="EducationOrganizationAddresses" memberSelection="IncludeAll"/> <!-- Inherited Collection -->
			<Collection name="SchoolCategories" memberSelection="IncludeAll" /> <!-- Collection -->
		</ReadContentType>
		<WriteContentType memberSelection="IncludeOnly">
			<Property name="ShortNameOfInstitution" />                          <!-- Inherited property -->
			<Property name="OperationalStatusType" />                           <!-- Inherited Type property -->
			<Property name="WebSite" />                                         <!-- Property -->
			<Property name="CharterStatusType" />                               <!-- Type property -->
			<Property name="AdministrativeFundingControlDescriptor" />          <!-- Descriptor property -->
			<Collection name="EducationOrganizationInternationalAddresses" memberSelection="IncludeAll" /> <!-- Inherited Collection -->
			<Collection name="SchoolGradeLevels" memberSelection="IncludeAll" /> <!-- Collection -->
		</WriteContentType>
	</Resource>
</Profile>
Resource members can be explicitly excluded based on the member selection:
<Profile name="Test-Profile-Resource-ExcludeOnly">
	<Resource name="School">
		<ReadContentType memberSelection="ExcludeOnly">
			<Property name="NameOfInstitution" />                               <!-- Inherited property -->
			<Property name="OperationalStatusType" />                           <!-- Inherited Type property -->
			<Property name="CharterApprovalSchoolYearTypeReference" />          <!-- Property -->
			<Property name="SchoolType" />                                      <!-- Type property -->
			<Property name="AdministrativeFundingControlDescriptor" />          <!-- Descriptor property -->
			<Collection name="EducationOrganizationAddresses" memberSelection="IncludeAll" /> <!-- Inherited Collection -->
			<Collection name="SchoolCategories" memberSelection="IncludeAll" /> <!-- Collection -->
		</ReadContentType>
		<WriteContentType memberSelection="ExcludeOnly">
			<Property name="ShortNameOfInstitution" />                          <!-- Inherited property -->
			<Property name="OperationalStatusType" />                           <!-- Inherited Type property -->
			<Property name="WebSite" />                                         <!-- Property -->
			<Property name="CharterStatusType" />                               <!-- Type property -->
			<Property name="AdministrativeFundingControlDescriptor" />          <!-- Descriptor property -->
			<Collection name="EducationOrganizationInternationalAddresses" memberSelection="IncludeAll" /> <!-- Inherited Collection -->
			<Collection name="SchoolGradeLevels" memberSelection="IncludeAll" /> <!-- Collection -->
		</WriteContentType>
	</Resource>
</Profile>
The same inclusion/exclusion rules apply to child collections (e.g., the School's addresses):
<!-- Child collection IncludeOnly/ExcludeOnly profiles -->
<Profile name="Test-Profile-Resource-BaseClass-Child-Collection-IncludeOnly">
	<Resource name="School">
		<ReadContentType memberSelection="IncludeOnly">
			<Collection name="EducationOrganizationAddresses" memberSelection="IncludeOnly">
				<Property name="City" />
				<Property name="StateAbbreviationType" />
				<Property name="PostalCode" />
			</Collection>
		</ReadContentType>
		<WriteContentType memberSelection="IncludeOnly">
			<Collection name="EducationOrganizationAddresses" memberSelection="IncludeOnly">
				<Property name="Latitude" />
				<Property name="Longitude" />
			</Collection>
		</WriteContentType>
	</Resource>
</Profile>
The data policy can contain filters on child collection items (e.g., only include Physical and Shipping addresses):
<!-- Child collection filtering on types and descriptors -->
<Profile name="Test-Profile-Resource-Child-Collection-Filtered-To-IncludeOnly-Specific-Types-and-Descriptors">
	<Resource name="School">
		<ReadContentType memberSelection="IncludeOnly">
			<Collection name="EducationOrganizationAddresses" memberSelection="IncludeOnly">
				<Filter propertyName="AddressType" filterMode="IncludeOnly">
					<Value>Physical</Value>
					<Value>Shipping</Value>
				</Filter>
				<Property name="StreetNumberName" />
				<Property name="City" />
				<Property name="StateAbbreviationType" />
			</Collection>
		</ReadContentType>
	</Resource>
</Profile>
In the example above, GET requests will only return Physical and Shipping addresses. If also applied to the WriteContentType, the caller will receive an error response if they attempt to write anything other than Physical or Shipping addresses.
Adding Profiles to the Ed-Fi ODS / API Solution
This section outlines the steps necessary to integrate and activate the Profile definitions for use in an Ed-Fi ODS API.
Create the Visual Studio Project
To add Profiles to an Ed-Fi ODS / API, you can use the recommended approach of installing the Ed-Fi API Profiles project template for Visual Studio, or you can perform the corresponding steps manually. The instructions to use Visual Studio follow, and the manual steps are listed in Appendix A of this section.
Adding a Profiles Project Using the Visual Studio Project Template
To make adding Profiles to an existing API solution a simple process, a Visual Studio Project Template (Ed-Fi-API-Profiles-Project-Template.vsix) has been developed for that purpose.
- Install the template by downloading and launching the attached .vsix file.
- Restart Visual Studio and open the Ed-Fi ODS / API Solution file.
- Add a new project to the solution by clicking File > Add > New Project...
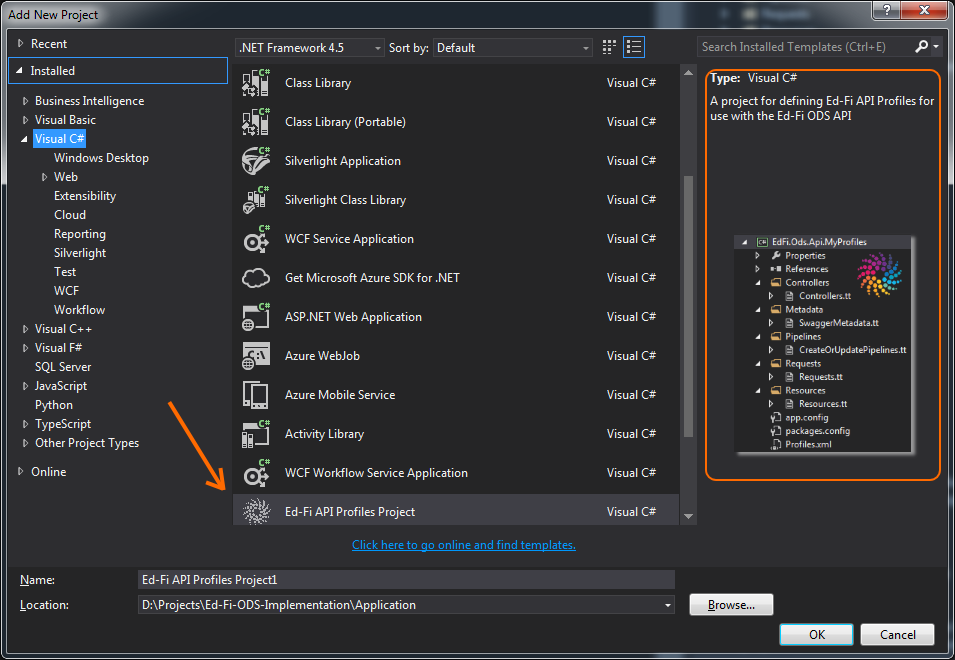
- In the "Add New Project" dialog, find the "Ed-Fi API Profiles Project" entry at the bottom of the Visual C# section, as shown below.
- Enter the project name for the new project and click OK. The suggested naming convention for this type of project is something like "EdFi.Ods.Api.MyProfiles".
- Review and modify Profiles.xml file. The Visual Studio Project Template creates a sample Profiles.xml file. You should open it and modify it to meet the needs of your profile.
Generate the API Artifacts
To generate the API artifacts, initiate the T4 template code generation process using one of the following mechanisms:
- Build the project.
- From the Build menu, select "Transform All T4 Templates" (this will generate all artifacts for the entire solution).
- Select the T4 template files individually (or simultaneously using Ctrl+click with your mouse), then right-click and choose Run Custom Tool.
At this point, your Solution Explorer should look something like this:
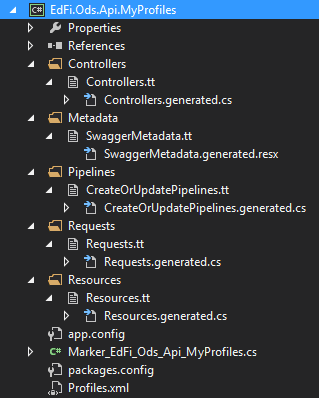
With the Profiles-specific code generated, it's time to integrate it with ASP.NET WebAPI framework.
Integrating Profiles into the ASP.NET WebAPI
To integrate the Profiles into the WebAPI, start by ensuring you have a marker interface in the root of your Profiles project, similar to the following (rename to match your assembly). If you used the Visual Studio Project template to create your profile, a file will already exist, but you'll need to rename the interface and the file to match the convention. This interface is an idiom used in the Ed-Fi solution to enable a strongly-typed mechanism for obtaining a reference to the .NET assembly.
namespace EdFi.Ods.Api.MyProfiles
{
    public interface Marker_EdFi_Ods_Api_MyProfiles { }
}
Next, you will need to perform the following tasks in the EdFi.Ods.WebApi project (located in the solution under "Entry Points"):
- Add a reference to the Profiles project you constructed in the previous section.
Add a custom OWIN startup class named MyProfilesSandboxStartup in the Startup folder:
MyProfilesSandboxStartupusing System.Web.Http; using Castle.MicroKernel.Registration; using EdFi.Ods.Api.MyProfiles; using EdFi.Ods.Api.Startup; using EdFi.Ods.WebApi.Startup; using Microsoft.Owin; using Owin; [assembly: OwinStartup("MyProfilesSandbox", typeof(MyProfilesSandboxStartup))] namespace EdFi.Ods.WebApi.Startup { public class MyProfilesSandboxStartup : SandboxStartupBase { public override void Configuration(IAppBuilder appBuilder) { base.Configuration(appBuilder); // Register additional controllers from the profiles Container.Register( Classes.FromAssemblyContaining<Marker_EdFi_Ods_Api_MyProfiles>() .BasedOn<ApiController>() .LifestyleScoped()); } } }Modify the Web.config file to use the new custom Startup class.
Web.config changes<appSettings> <!-- The name of the OWIN startup class for this website --> <!--<add key="owin:appStartup" value="Sandbox" />--> <!-- Use this OWIN startup class to incorporate Profiles into the Sandbox (then add a project reference to Profiles project) --> <add key="owin:appStartup" value="MyProfilesSandbox" /> ...
With these steps completed, when the API is launched (or deployed), the Profiles will now be accessible through the API.
Profiles do not affect XML data files uploaded via the API Bulk Load Services.
Confirming Profile Settings
As you've seen, Profile settings are flexible. With this flexibility comes some complexity – so platform hosts will want to confirm that the API Profiles that get deployed behave as expected, exposing exactly the right resources. This can be done manually, however, the technical article Verifying API Profile Settings Using the Java SDK provides guidance on using code generation techniques to get confirmation that the API is behaving as expected.
Adding Profiles to the API Administration Database
The EdFi_Admin database stores the data required to manage API keys and secrets, as well as Education Organization and Profile assignments. When the API is initialized, the names of the Profiles that have been configured into the API will be published to the Profiles table. This process performs a one-way publishing and will not remove existing Profile names that are no longer contained within the API configuration.
The EdFi_Admin tables related to this process are shown below.

Appendix A: Adding a Profiles Project Manually
To add a Profiles project to the Ed-Fi ODS API solution manually, perform the following tasks:
- Add a new class library project to the Ed-Fi-Ods Solution. The suggested name for this project is something like "EdFi.Ods.Api.MyProfiles".
- Delete the automatically added Class1.cs file.
- Add the following Project references:
EdFi.Ods.Api
EdFi.Ods.Common
EdFi.Ods.Standard Add a .NET assembly reference for the following:
System.Runtime.Serialization
System.ComponentModel.DataAnnotationsSave the Project and then edit the EdFi.Ods.Api.MyProfiles.csproj file in a text editor. Add the following line at the bottom:
  <!-- Add this line to enable code generation -->
  <Import Project="../../../Ed-Fi-ODS/Application/T4TextTemplating.Targets" />

  <!-- To modify your build process, add your task inside one of the targets below and uncomment it.
       Other similar extension points exist, see Microsoft.Common.targets.
  <Target Name="BeforeBuild">
  </Target>
  <Target Name="AfterBuild">
  </Target>
  -->
</Project>
Add an XML file named Profiles.xml to the root of the project, and add the appropriate profile definitions. It should look something like the following:
<?xml version="1.0" encoding="utf-8" ?> <Profiles> <Profile name="School-and-Student-Sample"> <Resource name="School"> <ReadContentType memberSelection="IncludeAll" /> <WriteContentType memberSelection="IncludeAll" /> </Resource> <Resource name="Student"> <ReadContentType memberSelection="IncludeAll" /> <WriteContentType memberSelection="IncludeAll" /> </Resource> </Profile> </Profiles>- In the Profiles.xml Properties, change the "Build Action" setting to "Embedded Resource".
Open the Package Manager Console in Visual Studio and install the following packages (consider using the
-versionflag to avoid introducing multiple versions of assemblies into the solution):Installing Fluent ValidationInstall-Package FluentValidation -ProjectName EdFi.Ods.Api.MyProfiles
Installing the JSON serializerInstall-Package Newtonsoft.Json -ProjectName EdFi.Ods.Api.MyProfiles -Version 7.0.1
Installing System.Web.HttpInstall-Package Microsoft.AspNet.WebApi.Core -ProjectName EdFi.Ods.Api.MyProfiles
Create the following folders at the root of the project: Controllers, Metadata, Pipelines, Requests, and Resources. In each of the folders, add a corresponding T4 template file, as shown below:
Controllers.tt<#@ template debug="true" hostspecific="true" language="C#" #> <#@ include file="$(ttIncludeFolder)\Controllers.ttinclude" #>
SwaggerMetadata.tt<?xml version="1.0" encoding="utf-8"?> <#@ template debug="true" hostspecific="true" language="C#" #> <#@ include file="$(ttIncludeFolder)\SwaggerMetadata.ttinclude" #>
CreateOrUpdatePipelines.tt<#@ template debug="true" hostspecific="true" language="C#" #> <#@ include file="$(ttIncludeFolder)\CreateOrUpdatePipelines.ttinclude" #>
Requests.tt<#@ template debug="true" hostspecific="true" language="C#" #> <#@ include file="$(ttIncludeFolder)\Requests.ttinclude" #>
Resources.tt<#@ template debug="true" hostspecific="true" language="C#" #> <#@ include file="$(ttIncludeFolder)\Resources.ttinclude" #>
Modify the AssemblyInfo.cs file in the Properties folder, adding the following code:
AssemblyInfo.cs Additionsusing EdFi.Ods.Api.Services.Metadata; // Identify embedded resources containing Swagger metadata [assembly: SwaggerMetadataResource("EdFi.Ods.Api.MyProfiles.Metadata.SwaggerMetadata.generated")]
The following link is a Visual Studio Project Template:
