This version of the Ed-Fi ODS / API is no longer supported. See the Ed-Fi Technology Version Index for a link to the latest version.
API Composite Resources
Geoffrey McElhanon
Ian Christopher
Analytics
Overview
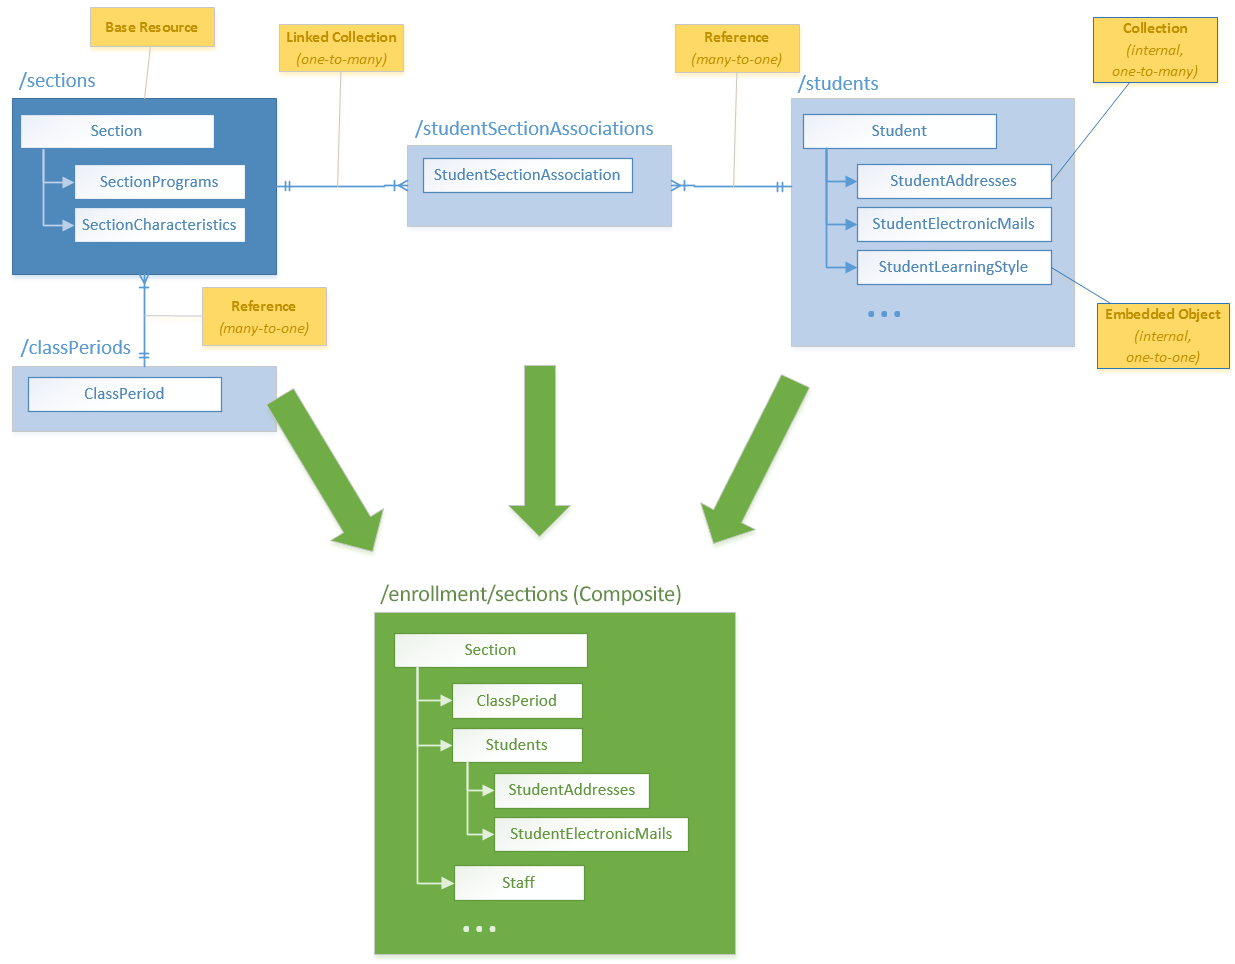
An API composite resource definition enables the Ed-Fi ODS / API to provide subject-oriented data from multiple API resources in a single request, resulting in a simple data integration experience for API consumers.
The following terminology is used when describing a composite resource definition:
- Composite Category. The logical grouping of a set of related composite resources (e.g., Enrollment, Assessment, etc.). The Composite Category acts as a container for the composite definition, and the Category name is used throughout the code and documentation to refer to the Composite.
- Base Resource. The Ed-Fi ODS / API resource that forms the basis for the queries against the ODS, and which provides the data that appears at the root of the API's JSON response.
- Collection. Refers to one-to-many relationships within a resource (such as with StudentAddress within the Student resource).
- Embedded Object. Refers to one-to-one relationships within a resource (such as with StudentLearningStyle within the Student resource).
- Linked Collection. Refers to one-to-many relationships than span resources (such as with the relationship from a Student to the related StudentSectionAssociations, which are individual resources on the Ed-Fi ODS / API).
- Reference. Refers to many-to-one relationships between resources (such as with the relationship between a StudentSectionAssociation and its related Student).
The composite resource is defined by first identifying the Base Resource that will serve as the source of data that is at the root of the resulting JSON payload. From that base resource, data can be included from other entities within the Base Resource (such as collections or embedded objects) or by "walking" the Ed-Fi model's relationships to other API resources (such as references and linked collections).
The diagram below depicts the composition process of a possible Enrollment Section composite resource:

Composite Definition
The composite definition is expressed in XML in terms of the resource model's members (not to be confused with the JSON representation). It is used by the Ed-Fi ODS / API at runtime to construct the queries necessary to assemble the composite resource, and by the code generation process in Visual Studio to create the associated Swagger metadata.
An XML schema containing standard Composite Definitions is included in the Ed-Fi-ODS repository at Ed-Fi-ODS\Application\EdFi.Ods.CodeGen\Models\CompositeMetadata\Ed-Fi-ODS-API-Composites.xsd. Additionally, a full set of composite definitions used for unit testing can be found at Ed-Fi-ODS\EdFi.Ods.Api.Composites.Test\Composites.xml. These definitions contain many different facets of the composite definition applied to API resources and may serve as useful reference examples for implementers.
The basic structure of a Composite Definition is as follows:
<CompositeMetadata>
  <Category displayName="..." name="...">
    <Routes>
       ...
    </Routes>
    <Composites>
      <Composite name="...">
        <Specification>
          ...
        </Specification>
        <BaseResource name="...">
          ...
        </BaseResource>
      </Composite>
      <Composite name="...">
        ...
      </Composite>
    </Composites>
  </Category>

  <Category>
    ...
  </Category>
</CompositeMetadata>
Composite Category
<Category name="Enrollment" displayName="Ed-Fi Enrollment">
The composite category provides a logical grouping for a set of related composite resources. The category name attribute determines the top-level segment for the WebAPI route definitions in the Ed-Fi ODS / API. For example, a composite resource of "Section" defined within a category name of "enrollment" would be exposed on the following URL:
http://{host}/api/v2.0/2016/enrollment/sections
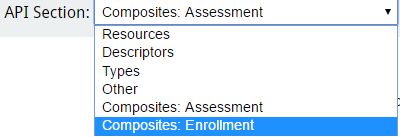
The name attribute is used in the routes, and is also normalized (introducing spaces, if appropriate) for display in the API Section drop down list in the Swagger UI:

The displayName attribute provides the descriptive name used in the Swagger metadata for the section. This will appear in the title for the Swagger UI pages displayed for the category:
Composite Routes and Specifications
When the Composite Definition is processed during the initialization of the Ed-Fi ODS / API, a default route is registered for each of the composite resources. Thus, the following URLs are supported by the as-shipped API for composite resources:
http://{host}/api/v2.0/2016/enrollment/sectionshttp://{host}/api/v2.0/2016/enrollment/sections/647d626a7a434ca08621494efc406c06
Additionally, each composite category has the opportunity to define an additional set of WebAPI-style routes for the contained composite resources. The listing below shows how routes could be defined for an "Enrollment" category. Note that each route must contain a {compositeName} parameter as this is what is used by the CompositeResourceController to identify the composite resource for an incoming request.
    <Routes>
      <Route relativeRouteTemplate="/localEducationAgencies/{LocalEducationAgency.Id}/{compositeName}" />
      <Route relativeRouteTemplate="/schools/{School.Id}/{compositeName}" />
      <Route relativeRouteTemplate="/sections/{Section.Id}/{compositeName}" />
      <Route relativeRouteTemplate="/staffs/{Staff.Id}/{compositeName}" />
      <Route relativeRouteTemplate="/students/{Student.Id}/{compositeName}" />
    </Routes>
When the routes are registered with WebAPI at runtime, the composite category name is automatically included in the registration. For example, the first route defined above would match an API request for the following URL:
http://{host}/api/v2.0/2016/enrollment/647d626a7a434ca08621494efc406c06/sections
In this example, once the route is matched by WebAPI, the LocalEducationAgency.Id parameter will be bound to a value of 647d626a7a434ca08621494efc406c06. However, in order for the Ed-Fi ODS / API to incorporate this criteria appropriately, it requires some additional information about how to apply the LocalEducationAgency.Id parameter to the queries. This is where the Specification for the composite resource comes in to play. Consider the following example:
<Specification>
  <Parameter name="LocalEducationAgency.Id" filterPath="School->LocalEducationAgency.Id" />
  <Parameter name="School.Id" filterPath="School.Id" />
  <Parameter name="Staff.Id" filterPath="StaffSectionAssociations->Staff.Id" />
  <Parameter name="Student.Id" filterPath="StudentSectionAssociations->Student.Id" />
</Specification>
The filterPath attribute provides the detail necessary to incorporate appropriate criteria and joins to the queries. Continuing with the example, the parameter definition specifies that in order to apply the LocalEducationAgency.Id parameter to the query, we first need to "crawl" from the base resource (i.e., Section) up to the School, then to the LocalEducationAgency to filter on its "Id" value. The path syntax uses arrows (i.e., ->) to indicate jumps between entities, and periods (i.e., .) to indicate property access.
Note in the specification above for the Section resource that there is no definition for the Section.Id parameter. Since it would not make sense for the API to respond to a request for /sections/647d626a7a434ca08621494efc406c06/sections, leaving this parameter out of the specification effectively prevents the corresponding route definition from being used to process the request. The caller would receive a 404 Not Found response in this situation.
Composite Resource Structural Definition
Every composite resource's structural definition begins with the <Composite> element.
<Composite name="SectionEnrollment">
The name attribute should be the singularized form of the name of the resource to be exposed on the API. In the example above, this will appear on the API as /sectionEnrollments.
The next element is the <Specification> element (which is described in the previous section), followed by the <BaseResource> element:
<BaseResource name="Section">
This element identifies the API Resource to be used as the root of the composite resource. Properties can be included through the use of the <Property> element. The displayName can be used to change the name used in the JSON output.
<Property name="FirstName" displayName="first" />
<Property name="LastSurname" displayName="last" />
The <EmbeddedObject>, <Reference>, <Collection> and <LinkedCollection> elements all represent entity constructs and follow the same structure as the <BaseResource> with the exception that they can be "aliased" using the displayName attribute.
<EmbeddedObject name="StudentLearningStyle">
  ...
</EmbeddedObject>

<Reference name='SessionReference'>
  ...
</Reference>

<Collection name="StaffElectronicMails">
  ...
</Collection>

<LinkedCollection name="StudentSectionAssociations">
  ...
</LinkedCollection>
Additionally, the <Reference> and <EmbeddedObject> elements, which represent many-to-one and one-to-one relationships respectively, provide a flatten attribute to enable the selected resource members to be flattened into the containing parent element. This allows you to effectively control the depth of the resulting JSON payload.
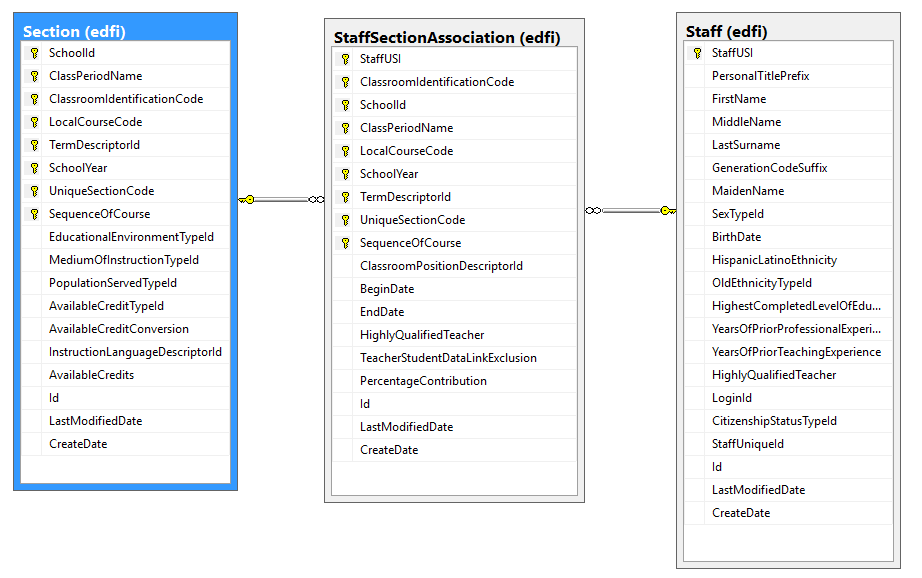
The displayName and flatten attributes can be combined to create a more natural collection output when the data is sourced through a many-to-many relationship. For example, consider the relationship between Section and Staff shown below:

Without the use of the flatten attribute, the composite resource definition and the resulting JSON payload would look something like the following:
<BaseResource name="Section">
  <Property name='Id' />
  <Property name='UniqueSectionCode' />
  <Property name='SequenceOfCourse' />
  <LinkedCollection name="StaffSectionAssociations">
    <Reference name="StaffReference">
      <Property name='StaffUniqueId' />
      <Property name='FirstName' />
      <Property name='LastSurname' />
    </Reference>
  </LinkedCollection>
</BaseResource>
[
  {
    "id":"647d626a7a434ca08621494efc406c06",
    "uniqueSectionCode":"MATH101",
    "sequenceOfCourse":4,
    "staffSectionAssociations":[
      {
        "staffReference":
          {
            "staffUniqueId":"S13784653",
            "firstName":"Jane",
            "lastSurname":"Doe"
          }
      },
      {
        "staffReference":
          {
            "staffUniqueId":"S13489134",
            "firstName":"John",
            "lastSurname":"Smith"
          }
      }
    ]
  }
]
Using flatten and displayName together produces a more natural result in the response:
<BaseResource name="Section">
  <Property name='Id' />
  <Property name='UniqueSectionCode' />
  <Property name='SequenceOfCourse' />
  <LinkedCollection name="StaffSectionAssociations" displayName="staff">
    <Reference name="StaffReference" flatten="true">
      <Property name='StaffUniqueId' />
      <Property name='FirstName' />
      <Property name='LastSurname' />
    </Reference>
  </LinkedCollection>
</BaseResource>
 [
  {
    "id":"647d626a7a434ca08621494efc406c06",
    "uniqueSectionCode":"MATH101",
    "sequenceOfCourse":4,
    "staff":[
      {
        "staffUniqueId":"S13784653",
        "firstName":"Jane",
        "lastSurname":"Doe"
      },
      {
        "staffUniqueId":"S13489134",
        "firstName":"John",
        "lastSurname":"Smith"
      }
    ]
  }
]
Security and Authorization
All data exposed through Composite API Resources is still subject to the same security checks performed for the authorization of API requests at all levels of the composite resources. The following list contains the impact of authorization on the API responses:
- Composite API Resources do not require additional security metadata to be defined in the EdFi_Security database. All authorization decisions and behavior are based on the metadata already defined for the existing Ed-Fi ODS / API resources.
- If the caller does not have access to the Base Resource of a composite, a
401 Unauthorizedresponse will be returned. - If the caller has access to "Read" the base resource but does not have "Read" access to a resource contained within the composite, that part of the composite resource will simply not be returned in the response.
- All data will be filtered appropriately for the current caller at all levels of the composite resource. In other words, you need not be concerned about accidentally exposing data to the API consumers that they couldn't obtain through the standard API domain aggregate resources.
Impact of API Profiles on Composites
API Profiles provide the ability to constrain the surface area of an API resource, limiting what parts of a resource are available to specific API consumers. While the main API resources require the use of a specific content type header by consumers who have been assigned Profiles, there is no such requirement for accessing composite resources (i.e., application/json is used in the client content type header).
Nevertheless, the Ed-Fi ODS / API still honors all the Profiles assigned to the current caller when processing a request. The Profiles are processed in an additive manner to produce the JSON response. In other words, if one assigned Profile includes a specific property through an "IncludeOnly" member selection mode, while another assigned Profile excludes the same property through an "ExcludeOnly" member selection mode, the property will be included in the response.
Additionally, if collection value filters are in use (e.g., limiting accessible student addresses to "Home" or "Physical"), only those items matching the constraints from the Profile will be returned in the response. To reiterate, if multiple Profiles are assigned to the caller, the collection value filters will be combined using "OR" semantics with any positive match resulting in the inclusion of the collection item in the API response.
Adding Composites to the Ed-Fi ODS / API Solution
This section outlines the steps necessary to integrate and activate the Composite definitions for use in an Ed-Fi ODS / API.
Create the Visual Studio Project
Create a new project to hold the artifacts related to your composite resources by folowing these steps:
- Add a new project to the solution by clicking File > Add > New Project...
- In the "Add New Project" dialog, find the "Class Library" entry.
- Enter the project name for the new project and click OK. The suggested naming convention for this type of project is something like "EdFi.Ods.Api.Composites.MyComposites".
- Add EdFi.Ods.Api as a Project reference.
Save the Project and then edit the EdFi.Ods.Api.MyComposites.csproj file in a text editor. Add the following line at the bottom:
  <!-- Add this line to enable code generation -->
  <Import Project="../../../Ed-Fi-ODS/Application/T4TextTemplating.Targets" />

  <!-- To modify your build process, add your task inside one of the targets below and uncomment it.
       Other similar extension points exist, see Microsoft.Common.targets.
  <Target Name="BeforeBuild">
  </Target>
  <Target Name="AfterBuild">
  </Target>
  -->
</Project>
Add an XML file named Composites.xml to the root of the project, and add the appropriate composite definition. It should look something like the following:
<CompositeMetadata> <Category displayName="My Sample Composites" name="MyComposite"> <Routes> <Route relativeRouteTemplate="/sections/{Section.Id}/{compositeName}" /> </Routes> <Composites> <Composite name="Student"> <Specification> <Parameter name="Section.Id" filterPath="StudentSectionAssociation->Section.Id" /> </Specification> <BaseResource name="Student"> <Property name="StudentUniqueId" /> <Property name="FirstName" /> <Property name="LastSurname" /> <Property name="BirthDate" /> </BaseResource> </Composite> </Composites> </Category> </CompositeMetadata>- In the Composites.xml Properties, change the "Build Action" setting to "Embedded Resource".
Create a Metadata folder in the root of the project, and add the following T4 template file:
SwaggerMetadataComposites.tt<?xml version="1.0" encoding="utf-8"?> <#@ template debug="true" hostspecific="true" language="C#" #> <#@ include file="$(ttIncludeFolder)\SwaggerMetadataComposites.ttinclude" #>
Modify the AssemblyInfo.cs file in the Properties folder, adding the following code:
AssemblyInfo.cs Additionsusing EdFi.Ods.Api.Services.Metadata; // Identify embedded resources containing Swagger metadata [assembly: SwaggerMetadataResource("EdFi.Ods.Api.Composites.MyComposites.Metadata.SwaggerMetadataComposites.generated")]
Generate the Swagger Metadata
To generate the Swagger metadata, initiate the T4 template code generation process using one of the following mechanisms:
- Build the project.
- From the Build menu, select "Transform All T4 Templates" (this will generate all artifacts for the entire solution).
- Select the T4 template files individually (or simultaneously using Ctrl + Click with your mouse), and then right-click and choose Run Custom Tool.
With the Composites Swagger metadata generated, it's time to integrate it with the ASP.NET WebAPI framework.
Integrating Composites into the ASP.NET WebAPI
To integrate the Composite Resources into the WebAPI, start by ensuring you have a "marker" interface in the root of your Composites project, similar to the following (rename to match your assembly). This interface is an idiom used in the Ed-Fi solution to enable strongly-typed mechanism for obtaining a reference to the .NET assembly.
namespace EdFi.Ods.Api.Composites.MyComposites
{
    public interface Marker_EdFi_Ods_Api_Composites_MyComposites { }
}
Next, you will need to perform the following tasks in the EdFi.Ods.WebApi project (located in the Ed-Fi-ODS-Implementation repository):
- Add a reference to the Composites project you constructed in the previous section.
Add a custom OWIN startup class named MyCompositesSandboxStartup in the Startup folder (or modify your existing startup class as follows):
using System.Web.Http;
using EdFi.Ods.Api.Composites.Enrollment;
using EdFi.Ods.Api.Startup;
using EdFi.Ods.WebApi.Startup;
using Microsoft.Owin;

[assembly: OwinStartup("MyCompositesSandbox", typeof(MyCompositesSandboxStartup))]

namespace EdFi.Ods.WebApi.Startup
{
    public class MyCompositesSandboxStartup : SandboxStartup
    {
        protected override void ConfigureRoutes(HttpConfiguration config)
        {
            // Ensure assembly containing Composites specification is loaded
            var compositesType = typeof(Marker_EdFi_Ods_Api_Composites_MyComposites);

            base.ConfigureRoutes(config);
        }
    }
}
Modify the Web.config file to use the new custom Startup class.
Web.config changes<appSettings> <!-- The name of the OWIN startup class for this website --> <!--<add key="owin:appStartup" value="Sandbox" />--> <!-- Use this OWIN startup class to incorporate Composites into the Sandbox (then add a project reference to Composites project) --> <add key="owin:appStartup" value="MyCompositesSandbox" /> ...
With these steps completed, when the API is launched (or deployed), the Composite resources will now be accessible through the API.